Monday, August 15, 2011

Multiple file uploads with progress bar using classic ASP.NET and C#

Introduction
This article gives readers a fair idea of how to create a progress bar while uploading single/multiple files in a web based application. We had a requirement in one of our projects for displaying a continuous progress bar along with percentage uploaded. This article will provide you great information about how to create such a control using ASP.NET 2.0 and .NET Framework 2.0. Also, the page on which this control is deployed will not be posted back as the solution uses an IFrame to load the file upload control. Users are free to access other parts of the page while the upload is still in progress.

Background
My initial idea was to calculate the progress amount on the server side and use a JavaScript timer function to read the server-side progress amount, with the XMLHttpRequest object to update the progress bar from the client side. That didn't go well, as it shows either a 0% or a complete 100%, but not continuous progress. I used Mozilla Firebug to trace out the XMLHttpRequest object requesting pattern. For some reason, XMLHttpRequests are queued until the server-side event handler finishes its execution, in this case, the upload, so either it hits before the server-side upload started, or after the server-side upload is completed. Hence the progress bar either shows 0 or 100%.

I would like to say thanks to Mr. Munur Shaik: http://www.c-sharpcorner.com/UploadFile/munnamax/ProgressBar07062007122251PM/ProgressBar.aspx for the idea, which I have reused for creating my progress bar. Also, I would like to convey my thanks to our architect Anil Sistla for supporting me in completing the solution. I hope this article will definitely save a lot of time for those who are looking for a similar solution.

Using the code
Shown below is the source code structure. The UploadProgressBar.ascx file is the user control that displays a single file upload control with Add/Remove buttons. The Add button adds the multiple file upload controls, whereas Remove clears the file upload controls one at a time.

The image below shows the initial file upload screen. FileUploadIframe.aspx contains a simple HTML IFrame tag to load the control page (FileUpload.aspx). Here, IFrame is used because the main page on which the multi-file upload is placed should not postback when the Upload button is pressed.


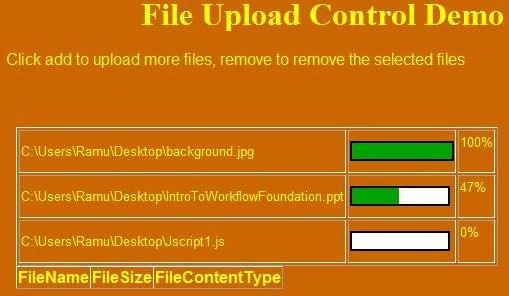
During file upload, the progress bar looks like below:


Below is the code for creating the progress bar:

Collapse | Copy Code
public void CreateProgress(HttpFileCollection fileCollection)
{
//string fileName, int id, string progressAmount
StringBuilder sbProgress = new StringBuilder();
sbProgress.Append(" ");
sbProgress.Append(""); for (int i = 0; i < fileCollection.Count; i++) { string strProgressBarId = "progressBar" + i; string strPercentageId = "percentage" + i; string fileName = fileCollection[i].FileName; sbProgress.Append("" + " "); } sbProgress.Append("

" + fileName +
"

");
sbProgress.Append("

");
for (int i = 0; i < fileCollection.Count; i++) { sbProgress.Append("");
}
sbProgress.Append(PrepareTheGridHtml());
sbProgress.Append("");

HttpContext.Current.Response.Write(sbProgress.ToString());
HttpContext.Current.Response.Flush();
}This method (CreateProgress()) basically pumps the progress bar HTML to the output stream to create an empty progress bar. In the above code, SetProgressBarProgressAmount(..) is a JavaScript method which takes two parameters: the first parameter is the ID of the progress bar, which is necessary in case multiple progress bars are displayed, and the second parameter is the progress amount. As the file downloads to the server, this progress bar will be set as per the percentage of download, and finally, when the file download completes, it will be set to 100%. In the case of multiple file uploads, multiple progress bars will be displayed, one per each file, and the files will be uploaded to the server one by one, and we can see the progress amount of each file. Below is the code which downloads the file to the server:

Collapse | Copy Code
public void DownloadTheFileToServer(HttpPostedFile file, int id)
{
Stream stream = null;
FileStream fs = null;

#region File Download Code goes here
try
{
string strFileName = System.IO.Path.GetFileName(file.FileName);
int contentLength = file.ContentLength;
stream = file.InputStream;
long totalUploadSize = stream.Length;
int bufferSize = 0;
//less than 1kB
if (totalUploadSize <= 1024) { bufferSize = 1024; } //less than 4kB but more than 1kB else if (bufferSize <= 4096) { bufferSize = 4096; } //less than 8Kb else if (bufferSize <=8192) { bufferSize = 8192; } else { bufferSize = 16384; } byte[] b = new byte[1024]; int tripDownloadSize = 0; long totalDownloadedSize = 0; float Percentage = 0; bool isNewFile = true; string fileStoreLocation = ConfigurationManager.AppSettings["FileStoreLocation"]; fs = new FileStream(fileStoreLocation + strFileName, FileMode.Append); //Uplaods 8Kb at a time while ((tripDownloadSize = stream.Read(b, 0, 1024)) > 0)
{
fs.Write(b, 0, tripDownloadSize);
totalDownloadedSize += tripDownloadSize;
Percentage = (int)(totalDownloadedSize * 100) / totalUploadSize;
setProgressBar(id, Percentage.ToString());
System.Threading.Thread.Sleep(100);
isNewFile = false;
}

}
catch (Exception objException)
{
throw objException;
}
finally
{
if (stream != null)
{
stream.Close();
stream.Dispose();
}
if (fs != null)
{
fs.Close();
fs.Dispose();
}
}
#endregion
}In the above method, based on the size of the file, I have written logic to decide the buffer size of the stream, but it is entirely up to the developer how he wants to set the buffer size (byte array size) for reading the input stream. This article mainly concentrates on how to create/update the progress while the file download is in progress. In the above code, inside the while loop, every time the total downloaded size is calculated, and the percentage of the download will be determined by the formula: total downloaded size / total file size * 100. Using the method setProgressBar(id, Percentage), we can set the progress for a particular progress bar with id as id. Below is the code for the SetProgressBar method:

Collapse | Copy Code
public static void setProgressBar(int id, string progressAmount)
{
StringBuilder sb = new StringBuilder();
sb.Append("<body><script type='text/javascript'>" +
"SetProgressBarProgressAmount(" + id + ",'" + progressAmount +
"'); </script></body>");
HttpContext.Current.Response.Write(sb.ToString());
HttpContext.Current.Response.Flush();
}Search the web.config file for the entry FileStoreLocation under appsettings, and set it to the local folder location on your machine; files uploaded through the file upload control will be downloaded to this location.

Refer to:http://www.codeproject.com/KB/webforms/FileUploadWithProgrss.aspx

Wednesday, August 10, 2011

图片的二进制数据库存储和显示

1.将图片以二进制存入数据库
2.读取二进制图片在页面显示
3.设置Image控件显示从数据库中读出的二进制图片
4.GridView中ImageField以URL方式显示图片
5.GridView显示读出的二进制图片
6.用ashx显示图片

1.将图片以二进制存入数据库

C#
--------------------------
//保存图片到数据库
protected void Button1_Click(object sender, EventArgs e)
{
//图片路径
string strPath = "~/photo/03.JPG";
string strPhotoPath = Server.MapPath(strPath);
//读取图片
FileStream fs = new System.IO.FileStream(strPhotoPath, FileMode.Open, FileAccess.Read);
BinaryReader br = new BinaryReader(fs);
byte[] photo = br.ReadBytes((int)fs.Length);
br.Close();
fs.Close();
//存入
SqlConnection myConn = new SqlConnection("Data Source=127.0.0.1;Initial Catalog=TestDB;User ID=sa;Password=sa");
string strComm = " INSERT INTO personPhoto(personName, personPhotoPath, personPhoto) ";
strComm += " VALUES('wangwu', '" + strPath + "', @photoBinary )";
SqlCommand myComm = new SqlCommand(strComm, myConn);
myComm.Parameters.Add("@photoBinary", SqlDbType.Binary,photo.Length);
myComm.Parameters["@photoBinary"].Value = photo;
myConn.Open();
myComm.ExecuteNonQuery();
myConn.Close();
}
2.读取二进制图片在页面显示

C#
--------------------------
//读取图片
SqlConnection myConn = new SqlConnection("Data Source=127.0.0.1;Initial Catalog=TestDB;User ID=sa;Password=sa");
string strComm = " SELECT personPhoto FROM personPhoto WHERE personName='wangwu' ";
SqlCommand myComm = new SqlCommand(strComm, myConn);
myConn.Open();
SqlDataReader dr = myComm.ExecuteReader();
while (dr.Read())
{
byte[] photo = (byte[])dr["personPhoto"];
this.Response.BinaryWrite(photo);
}
dr.Close();
myConn.Close();


SqlConnection myConn = new SqlConnection("Data Source=127.0.0.1;Initial Catalog=TestDB;User ID=sa;Password=sa");
SqlDataAdapter myda = new SqlDataAdapter(" SELECT personPhoto FROM personPhoto WHERE personName='wangwu' ", myConn);
DataSet myds = new DataSet();
myConn.Open();
myda.Fill(myds);
myConn.Close();
//
byte[] photo = (byte[])myds.Tables[0].Rows[0]["personPhoto"];
this.Response.BinaryWrite(photo);

3.设置Image控件显示从数据库中读出的二进制图片

C#
---------------------------------------------
SqlConnection myConn = new SqlConnection("Data Source=192.168.0.36;Initial Catalog=TestDB;User ID=sa;Password=sa");
SqlDataAdapter myda = new SqlDataAdapter(" SELECT personPhoto FROM personPhoto WHERE personName='wangwu' ", myConn);
DataSet myds = new DataSet();
myConn.Open();
myda.Fill(myds);
myConn.Close();
//
byte[] photo = (byte[])myds.Tables[0].Rows[0]["personPhoto"];
//图片路径
string strPath = "~/photo/wangwu.JPG";
string strPhotoPath = Server.MapPath(strPath);
//保存图片文件
BinaryWriter bw = new BinaryWriter(File.Open(strPhotoPath,FileMode.OpenOrCreate));
bw.Write(photo);
bw.Close();
//显示图片
this.Image1.ImageUrl = strPath

4.GridView中ImageField以URL方式显示图片
----------------------------


后台直接绑定即可

5.GridView显示读出的二进制图片
------------------------------
//样板列


//绑定

C#
protected void GridView1_RowDataBound(object sender, GridViewRowEventArgs e)
{
if (e.Row.RowIndex < 0) return; // System.ComponentModel.Container string strPersonName = (string)DataBinder.Eval(e.Row.DataItem, "personName"); Image tmp_Image = (Image)e.Row.Cells[2].FindControl("Image1"); if (!System.Convert.IsDBNull(DataBinder.Eval(e.Row.DataItem, "personPhoto"))) { // byte[] photo = (byte[])DataBinder.Eval(e.Row.DataItem, "personPhoto"); //图片路径 string strPath = "~/photo/" + strPersonName.Trim() + ".JPG"; string strPhotoPath = Server.MapPath(strPath); //保存图片文件 BinaryWriter bw = new BinaryWriter(File.Open(strPhotoPath, FileMode.OpenOrCreate)); bw.Write(photo); bw.Close(); //显示图片 tmp_Image.ImageUrl = strPath; } } 6.用ashx显示调用图片 (1)aspx页面代码


(2).GetImage.ashx代码

<%@ WebHandler Language="C#" Class="GetImage" %>

using System;
using System.Web;
using System.IO;
using System.Drawing;
using System.Data.SqlClient;

public class GetImage : IHttpHandler {

public void ProcessRequest (HttpContext context) {
//context.Response.ContentType = "text/plain";
//context.Response.Write("Hello World");
string id = (string)context.Request["id"];

MemoryStream stream = new MemoryStream();
SqlConnection conn = new SqlConnection(@"server=.;database=DBNAME;uid=sa;pwd=sa");
Bitmap bm = null;
Image image = null;
try
{
conn.Open();
SqlCommand cmd = new SqlCommand("select photo from table2 where id='" + id + "'", conn);
byte[] blob = (byte[])cmd.ExecuteScalar();

context.Response.ContentType = "image/gif";
context.Response.BinaryWrite(blob);
context.Response.End();

#region
/*
stream.Write(blob, 78, blob.Length - 78);
bm = new Bitmap(stream);

int width = 48;
int height = (int)(width * ((double)bm.Height / (double)bm.Width));


// getthumbnailimage生成缩略图
image = bm.GetThumbnailImage(width, height, null, IntPtr.Zero);

context.Response.ContentType= "image/jpeg";

image.Save(context.Response.OutputStream,System.Drawing.Imaging.ImageFormat.Jpeg);
*/
#endregion
}
catch (Exception ex)
{
throw new Exception(ex.Message);
}
finally
{
if (image != null)
image.Dispose();
if (bm != null)
bm.Dispose();
stream.Close();
conn.Close();

}

}

public bool IsReusable {
get {
return false;
}
}


}

Tuesday, August 9, 2011

Playing .wav files using C#


Introduction
To achieve some things in the .NET Framework, one must make platform invocation calls to the underlying OS, or use one of the thinly-wrapped COM objects exposed as a class library. This example shows how to play .WAV sounds from a file picker, or play a user-defined sound by enumerating the Windows registry. Since Microsoft did not include a method for playing sounds in the Framework, we must make a PInvoke call to the PlaySound() function located in the Winmm.dll library. The PlaySound function is extremely simple to use as you'll see below.

The PlaySound function
Collapse | Copy Code
bool PlaySound(
LPCSTR pszSound, // filename
HMODULE hmod, // handle to resource file
DWORD fdwSound) // sound flags
For this example, we play a sound directly from a filename, therefore we need only specify values for pszSound and fdwSound; The hmod parameter must be set to NULL unless playing a sound from a resource.
Partial Source
Collapse | Copy Code
using System;
using System.Drawing;
using System.Collections;
using System.ComponentModel;
using System.Windows.Forms;
using System.Data;
using System.Runtime.InteropServices; // for PInvoke
using Microsoft.Win32; // RegistryKey

namespace PlaySound
{
public class Form1 : System.Windows.Forms.Form
{
...
private RegistryKey key1;
private RegistryKey key2;


// collection of user-defined sound events
private PropertyCollection events;

// PlaySound()
[DllImport("winmm.dll", SetLastError=true,
CallingConvention=CallingConvention.Winapi)]
static extern bool PlaySound(
string pszSound,
IntPtr hMod,
SoundFlags sf );

// Flags for playing sounds. For this example, we are reading
// the sound from a filename, so we need only specify
// SND_FILENAME | SND_ASYNC
[Flags]
public enum SoundFlags : int
{
SND_SYNC = 0x0000, // play synchronously (default)
SND_ASYNC = 0x0001, // play asynchronously
SND_NODEFAULT = 0x0002, // silence (!default) if sound not found
SND_MEMORY = 0x0004, // pszSound points to a memory file
SND_LOOP = 0x0008, // loop the sound until next sndPlaySound
SND_NOSTOP = 0x0010, // don't stop any currently playing sound
SND_NOWAIT = 0x00002000, // don't wait if the driver is busy
SND_ALIAS = 0x00010000, // name is a registry alias
SND_ALIAS_ID = 0x00110000, // alias is a predefined ID
SND_FILENAME = 0x00020000, // name is file name
SND_RESOURCE = 0x00040004 // name is resource name or atom
}

...

private void buttonPlay_Click(object sender, System.EventArgs e)
{
int err = 0; // last error

try
{
// play the sound from the selected filename
if (!PlaySound( tbFileName.Text, IntPtr.Zero,
SoundFlags.SND_FILENAME | SoundFlags.SND_ASYNC ))
MessageBox.Show(this,
"Unable to find specified sound file or " +
"default Windows sound");
}
catch
{
// grab the underlying Win32 error code
err = Marshal.GetLastWin32Error();
if (err != 0)
MessageBox.Show( this,
"Error " + err.ToString(),
"PlaySound() failed",
MessageBoxButtons.OK,
MessageBoxIcon.Error );
}
}

// browse button handler
private void buttonBrowse_Click(object sender, System.EventArgs e)
{
string sysRoot = System.Environment.SystemDirectory;
OpenFileDialog dlg = new OpenFileDialog();
dlg.AddExtension = true;
dlg.Filter = "Wave files (*.wav)|*.wav|All files (*.*)|*.*" ;
// start in media folder
dlg.InitialDirectory = sysRoot + @"\..\Media";
// open dialog
if(dlg.ShowDialog(this) == DialogResult.OK)
{
tbFileName.Text = dlg.FileName;
}
}

...

// fill combobox with user-defined sounds
private void PopulateDropDown()
{
// fill our PropertyCollection object
events = GetUserDefinedSounds();

// disable if no sound events
if (events.Keys.Count == 0)
cbUserSound.Enabled = false;
else
{
foreach (string key in events.Keys)
{
cbUserSound.Items.Add(key);
}
}
}

// Retrieves the user-defined sounds from the registry
private PropertyCollection GetUserDefinedSounds()
{
string rootKey = "AppEvents\\Schemes\\Apps\\.Default";
PropertyCollection coll = new PropertyCollection();

try
{
// open root key
key1 = Registry.CurrentUser.OpenSubKey(rootKey, false);

// go through each subkey
foreach (string subKey in key1.GetSubKeyNames())
{
// open subkey
key2 = key1.OpenSubKey(subKey + "\\.Current", false);

// get filename, if any
if (key2 != null)
if (key2.GetValue(null).ToString().Length > 0)
coll.Add(subKey, key2.GetValue(null).ToString());
}
}
catch (Exception ex)
{
MessageBox.Show(this, ex.Message, "Yikes!",
MessageBoxButtons.OK, MessageBoxIcon.Error);
}
finally
{
// close keys
key1.Close();
key2.Close();
}

return coll;
}

...
}
}
You probably noticed the SetLastError=true parameter in the DllImport call. This simply states that the runtime marshaler calls GetLastError for us in the event something went wrong with our PInvoke call.

Points of Interest
This code has only been tested on Windows 2000 and XP SP1 using Framework version 1.1, however it should also work as far back as Windows 98. Oh yes, the project file is VS.NET 2003 - sorry.

History
Version 1.0 - 07.25.03 - First version.

From:http://www.codeproject.com/KB/audio-video/PlaySounds1.aspx

C# class library for exporting data to CSV/Excel file

Introduction
Exporting data from a datatable to Excel or CSV is one of the most common functionality required in ASP.NET pages. Users can download the data from the datagrid into an Excel spreadsheet or CSV file for offline verification and/or computation. This article includes the source code for such functionality.

The common problems in exporting data from datagrid are

1.To clean up the formatting and export data only.
2.The header row in Excel always contained the database column names which were sometimes unintelligible to an ordinary user.
3.Often the Datasets contain data, like Internal Reference ID, necessary for the datagrid generation, which we didn't want the end user to see.
To remedy all these issues I came up with the a simpler and more adaptable way to export the datagrid itself to Excel or CSV file.

I kept the concept to a dll so that it could easily be used throughout an application.

Using the ExportData class library
This class library is fully implemented in C#.NET. This dll doesn't need to be registered. Simply copy the assembly "RKLib.ExportData.dll" into your project folder and add it to references. You can also include the "ExportData" project and reference it in your project.

This can be used in WebForms as well as in WinForms by simply passing a parameter to the export object's constructor.

•For WebForms:
Collapse | Copy Code
RKLib.ExportData.Export objExport = new RKLib.ExportData.Export("Web")•For WinForms:
Collapse | Copy Code
RKLib.ExportData.Export objExport = new RKLib.ExportData.Export("Win")The ExportDetails method has three types of overloads. You can call whichever best suits your requirement.

The following are the overload types:

• Collapse | Copy Code
public void ExportDetails(DataTable DetailsTable,
ExportFormat FormatType, string FileName)• Collapse | Copy Code
public void ExportDetails(DataTable DetailsTable, int[]
ColumnList, ExportFormat FormatType, string FileName)• Collapse | Copy Code
public void ExportDetails(DataTable DetailsTable, int[]
ColumnList, string[] Headers, ExportFormat FormatType, string FileName)Have a glance at the parameters
•DetailsTable - DataTable to be exported.
•FormatType - Export File Format. Use Export.ExportFormat.CSV for the CSV file or Export.ExportFormat.Excel for the Excel file.
•FileName - Export File Name.
- For WebForms simply pass the filename. e.g. EmployeeInfo.xls
- For WinForms pass the filename along with path. e.g. C:\\EmployeeInfo.csv
•ColumnList - DataFields of the DataTable to be exported. Specify their ordinals in an integer array.
•Headersrs - Custom Headers List for the specified columns in the export file. Specify the names in a string array.
You can call this method in the: ASPButton_Click event, LinkButton_Click event or Page_Load event or wherever you want. All you need to do is set the values to parameters and give a simple call to the required overload type of ExportDetails method.

The following is the code block that demonstrates "exporting specified columns" of a DataTable as an Excel file from WebForm.

Collapse | Copy Code
[Code Behind]

private void btnExport2_Click(object sender, System.EventArgs e)
{
// Export the details of specified columns
try
{
// Get the datatable to export
DataTable dtEmployee = ((DataSet)
Session["dsEmployee"]).Tables["Employee"].Copy();

// Specify the column list to export
int[] iColumns = {1,2,3,5,6};

// Export the details of specified columns to Excel
RKLib.ExportData.Export objExport = new
RKLib.ExportData.Export("Web");
objExport.ExportDetails(dtEmployee,
iColumns, Export.ExportFormat.Excel, "EmployeesInfo2.xls");
}
catch(Exception Ex)
{
lblError.Text = Ex.Message;
}
}The following is the code block that demonstrates "exporting specified columns" of a DataTable as a CSV file from WindowsForm.

Collapse | Copy Code
private void btnExportCSV_Click(object sender, System.EventArgs e)
{
// Export the details of specified columns
try
{
lblMessage.Text = "";

// Get the datatable to export
DataTable dtEmployee = dsEmployee.Tables["Employee"].Copy();

// Specify the column list to export
int[] iColumns = {1,2,3,5,6};

// Export the details of specified columns to CSV
RKLib.ExportData.Export objExport = new
RKLib.ExportData.Export("Win");
objExport.ExportDetails(dtEmployee,
iColumns, Export.ExportFormat.CSV,
"C:\\EmployeesInfo.csv");
lblMessage.Text = "Successfully exported to
C:\\EmployeesInfo.csv";
}
catch(Exception Ex)
{
lblMessage.Text = Ex.Message;
}
}
Working with Demo Projects
To work with the WebForms Project in C#.NET

1.Extract the ExportDemo_CSharpNet.zip file to a designated directory.
2.Create a virtual directory in IIS with the name "ExportDemo_CSharpNet".
3.Open up the demo solution ExportDemo_CSharpNet.sln in Visual Studio 2003.
To work with WebForms Project in VB.NET

1.Extract the ExportDemo_VBNet.zip file to a designated directory.
2.Create a virtual directory in IIS with the name "ExportDemo_VBNet".
3.Open up the demo solution ExportDemo_VBNet.sln in Visual Studio 2003.
To work with WindowsForms Project in C#.NET

1.Extract the ExportDemo_WindowsForms.zip file to a designated directory.
2.Open up the demo solution ExportDataGrid.sln in Visual Studio 2003.
Points of Interest
•This doesn't require any stuff like page register tags.
•This can be used in WebForms as well as WinForms.
•This uses the XML features of dataset and XSLT for the export functionality.
•There is no looping through data elements.
•Use the export object as many times as required and however you want since export functionality needs a single and simple call to Export object.
•You can export as many datagrids as required on a single page.
•You can specify the column list to export.
•Even you can customize the headers of the export file.
History
•Posted on 29th Sep, 2004.
•Updated on 11th Oct, 2004. Updated files addresses export functionality from WinForms.
•Updated on 10th Apr, 2007. Updated files' addresses regarding the problem of special characters in column names.
License
This article has no explicit license attached to it but may contain usage terms in the article text or the download files themselves. If in doubt please contact the author via the discussion board below.

A list of licenses authors might use can be found here

From:http://www.codeproject.com/KB/aspnet/ExportClassLibrary.aspx

Deleting multiple Rows in GridView using Checkbox

In one of my other article “Using Checkbox in ASP.NET GridView Control”, I have shown you how you can update the row status in database using checkboxes in GridView. There are situations when you want to provide checkboxes in GridView for deleting multiple database records similar to Hotmail or Yahoo inboxes. GridView control allows you to delete only a single record at a time but in this tutorial I will show you how you can implement multiple records deletion scenario in GridView control.

To start this tutorial you add the GridView and Button controls on ASP.NET page and make sure your code looks similar to following:


The code above is straight forward and the important thing is the use of TemplateField to add a CheckBox control in every row of the GridView control. The data is provided to GridView control in the Page_Load event as follows:

protected void Page_Load(object sender, EventArgs e)
{
if (!Page.IsPostBack)
{
BindData();

btnDelete.Attributes.Add("onclick",
"return confirm('Are you sure you want to delete selected item(s) ?');");
}
}

private void BindData()
{
string constr = @"Server=TestServer; Database=SampleDB; uid=test; pwd=test;";
string query = @"SELECT * FROM Products";

SqlDataAdapter da = new SqlDataAdapter(query, constr);
DataTable table = new DataTable();

da.Fill(table);

GridView1.DataSource = table;
GridView1.DataBind();
}
Notice how I added Delete confirmation to the button using the Attributes collection in the Page_Load event. The rest of the code is binding the GridView to a Products table using the SqlDataAdapter and DataTable classes available in ADO.NET. If you will test your page you will see GridView with checkboxes similar to the figure shown above in the start of the tutorial. Now you have to write code on the Click event of the Button in which you need to check which products are selected for deletion. Following is the code for Delete button click event:

protected void btnDelete_Click(object sender, EventArgs e)
{
ArrayList productsToDelete = new ArrayList();

foreach (GridViewRow row in GridView1.Rows)
{
if (row.RowType == DataControlRowType.DataRow)
{
CheckBox chkDelete = (CheckBox)row.Cells[0].FindControl("chkDelete");

if (chkDelete != null)
{
if (chkDelete.Checked)
{
string productId = row.Cells[1].Text;
productsToDelete.Add(productId);
}
}
}
}

DeleteProducts(productsToDelete);
BindData();
}
In the above code I first created an ArrayList to store product id for all the selected products used has selected to delete. Then I am running a simple foreach loop to iterate all the rows in the GridView. Remember we are only interested in the rows where we have checkboxes we are not interested in Header, Footer or Pager rows that’s why I put one if condition check in the loop to make sure we only process data rows. Then I am getting the reference of every single CheckBox in the GridView using Cells collection and FindControl method. After I have Checkbox control available I am checking whether it is checked or not using Checked property and if it is checked I am reading Product ID of that product in second cell in the same row. I am also storing the product id in the productsToDelete ArrayList for later processing. Once the foreach loop is finished I called a custom method DeleteProducts and passed the productsToDelete ArrayList to the method. I am not implementing the code for DeleteProducts method but you can implement it easily once you know which items are available to delete from the database. The declaration of DeleteProducts will be similar to following:
private void DeleteProducts(ArrayList productsToDelete)
{

// Execute SQL DELETE Command to Delete all Products
// available in productsToDelete collection

// You can also pass productsToDelete ArrayList to
// your Data Access Layer component for delete operation
}
I hope you will be able to implement this scenario in your own ASP.NET website easily without facing any big issue.

Refer to:http://csharpdotnetfreak.blogspot.com/2009/04/delete-multiple-rows-gridview-checkbox.html
http://www.ezzylearning.com/tutorial.aspx?tid=2963442&q=deleting-multiple-rows-in-gridview-using-checkbox

DateTime Format


DateTime.Now; 4/19/2008 7:04:34 AM
DateTime.Now.ToString(); 4/19/2008 7:04:34 AM
DateTime.Now.ToShortTimeString()7:04 AM
DateTime.Now.ToShortDateString()4/19/2008
DateTime.Now.ToLongTimeString()7:04:34 AM
DateTime.Now.ToLongDateString()Saturday, April 19, 2008


DateTime.Now.ToString("d")4/19/2008
DateTime.Now.ToString("D")Saturday, April 19, 2008
DateTime.Now.ToString("f")Saturday, April 19, 2008 7:04 AM
DateTime.Now.ToString("F")Saturday, April 19, 2008 7:04:34 AM
DateTime.Now.ToString("g")4/19/2008 7:04 AM
DateTime.Now.ToString("G")4/19/2008 7:04:34 AM
DateTime.Now.ToString("m")April 19
DateTime.Now.ToString("r")Sat, 19 Apr 2008 07:04:34 GMT
DateTime.Now.ToString("s")2008-04-19T07:04:34
DateTime.Now.ToString("t")7:04 AM
DateTime.Now.ToString("T")7:04:34 AM
DateTime.Now.ToString("u")2008-04-19 07:04:34Z
DateTime.Now.ToString("U")Saturday, April 19, 2008 12:04:34 PM
DateTime.Now.ToString("y")April, 2008
DateTime.Now.ToString("dddd, MMMM dd yyyy")Saturday, April 19 2008
DateTime.Now.ToString("ddd, MMM d "'"yy")Sat, Apr 19 '08
DateTime.Now.ToString("dddd, MMMM dd")Saturday, April 19
DateTime.Now.ToString("M/yy")4/08
DateTime.Now.ToString("dd-MM-yy")19-04-08